How to Use MIDI Generators in Ableton Live
Ableton Live 12 MIDI Generators create new notes from musical constraints rather than modifying selected notes. They are useful for developing a rhythmic part, a melodic sketch, or a chord progression directly in a MIDI clip. Begin with a MIDI track that has an instrument or Drum Rack, then open a MIDI clip in Clip View. Ableton’s MIDI Tools documentation describes the current generator controls and behavior.
Video walkthrough
Open the Generate panel and define the target range
Double-click a MIDI clip to show Clip View, select the Notes tab, then open the Generate panel. Choose a generator from the Generator Selector. The native Live 12 generators are Rhythm, Seed, Shape, and Stacks.
Generators create notes in the selected time range. If there is no time selection, they use the clip loop instead. Plan the target area before generating: notes that do not overlap the result remain alongside it, but existing notes that overlap generated notes are replaced. Use an empty clip or a short time selection when you want to explore without affecting the rest of an arrangement.
Preview settings with Auto Apply or apply deliberately
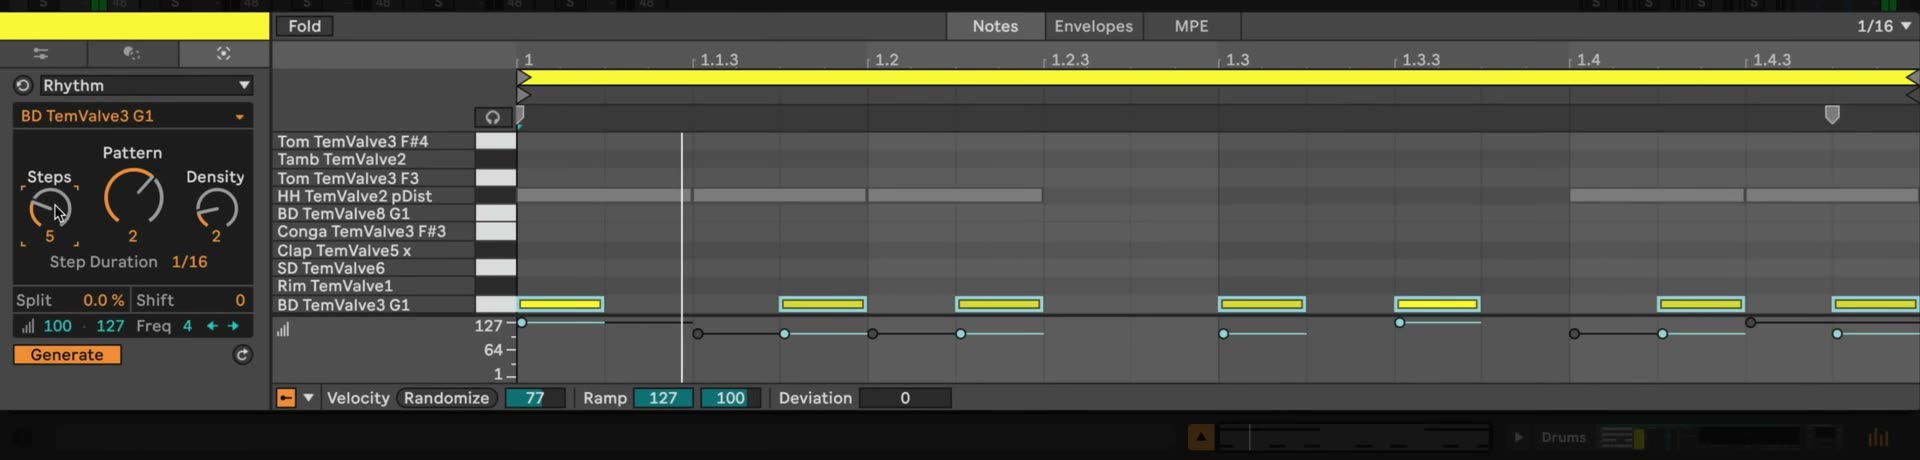
The Generate button is the generator’s Auto Apply switch. It is enabled by default, so changes to a generator’s parameters immediately update the notes in the target range. This makes it practical to listen while adjusting a pattern, pitch range, density, or rhythm.
Turn Auto Apply off when you want to adjust controls without changing the clip. Turning it off restores the notes to their original state. Then press Apply to create notes using the current settings, or use Ctrl+Enter on Windows or Cmd+Enter on macOS. Apply again to produce another result where the generator includes randomness.
Use Live’s Undo and Redo commands to reverse or restore generated MIDI notes. The Reset button resets the selected generator’s parameters only; it does not restore notes that have already been generated.
Generate a beat with Rhythm
Choose Rhythm for repeating note patterns and Drum Rack parts. Select the target pitch or drum pad with the Pitch control. You can also hold Alt on Windows or Option on macOS and click a piano-ruler key or Drum Rack pad to select it.
Start with the following controls:
- Steps sets how many steps make up the pattern, up to 16.
- Density sets how many of those steps contain notes.
- Pattern changes the placement of those notes; the available patterns depend on the Steps and Density settings.
- Step Duration controls how often the pattern repeats across the selected time range.
Use Shift to move the result earlier or later in time, then set velocity and accent behavior to give the part an appropriate dynamic shape. The Split control introduces a probability that a step will be divided into equally sized notes. Begin with a single pad, such as a hi-hat or kick, and generate separate patterns for other pads so each part remains easy to refine.
Constrain random ideas with Seed
Seed generates random notes within selected pitch, duration, and velocity ranges. Set the Minimum and Maximum Pitch controls, or drag the Pitch Range handles, to define the register. When a clip scale is enabled, pitch-related controls use scale degrees, which keeps the generated notes within that scale.
Set duration and velocity ranges next, then use Voices to limit the maximum number of simultaneous notes and Density to control the overall amount of generated material. Reapply Seed until the result is useful, then edit or delete individual notes as needed. A narrow pitch range and modest density are a reliable starting point when a generated part needs to leave space for other instruments.
Draw a melodic contour with Shape
Shape generates a sequence whose pitches follow a contour. Choose a preset from the Shape Presets menu or draw directly in the Shape display. Define the register with the minimum and maximum pitch controls, then set the amount of material with Density.
Use Rate to set the minimum note length. Tie determines the probability that a generated note will extend into the next note, and Jitter introduces random pitch deviation while keeping notes inside the chosen pitch range. Shape is useful when a line needs an overall rise, fall, arc, or custom contour without manually placing every note.
Build scale-aware chords with Stacks
Choose Stacks to add individual chords or produce a chord progression. It fills the selected time range or the clip loop when no range is selected. Use the Chord Selector Pad to choose a chord pattern; Live shows details for the hovered pattern in the Status Bar.
Set the clip scale before generating if the progression should follow a particular key. Stacks uses that scale for its chord decisions, so changing the clip’s root or scale changes the harmonic context. Apply it to an empty range first, then adjust chord durations, offsets, roots, or inversions in the MIDI editor when the progression needs further shaping.
Extend the selection with Max for Live generators
Live Standard and Suite include Euclidean, a Max for Live generator that creates Euclidean rhythms for up to four voices. It can assign each voice a pitch or Drum Rack pad, then use its steps, density, division, and rotation controls to shape the result.
Native generators are built into Live and their internal properties cannot be edited. Suite, or Standard with the Max for Live add-on, can also use, edit, or build compatible third-party Max for Live MIDI Tools. To make a third-party generator appear in the Generate panel, save its .amxd file in User Library/MIDI Tools/Max Generators or in a folder available through Live’s Places section.
Turn generated notes into an arrangement
Treat each result as MIDI material, not a fixed performance. Listen to it with the other tracks, then make ordinary note edits, adjust velocity, or generate only a smaller time range. Duplicating a clip before a broad experiment provides a quick comparison point.
Generators work best when their constraints serve an arrangement: use Rhythm for a defined pulse, Seed for constrained variations, Shape for a clear contour, and Stacks for a harmonic starting point. Once an idea fits, continue editing it as any other MIDI clip.